

Table of Contents
- Why Custom Shirt Sizing Accuracy Makes or Breaks Your Order
- What You'll Need Before You Measure
- How to Measure a T-Shirt for Printing (The Laying Flat Method)
- The T-Shirt Design Placement Guide: Where Artwork Actually Goes
- Scaling Designs for Different Garment Sizes: The Math That Matters
- Fabric Shrinkage, Fabric Types, and Their Impact on Sizing
- Custom T-Shirt Printing Without Minimums: Why Small Orders Still Need Accurate Sizing
- Common Sizing Mistakes to Avoid (And How to Fix Them)
- Frequently Asked Questions
Last Updated: September 13, 2026
Why Custom Shirt Sizing Accuracy Makes or Breaks Your Order
Getting custom shirt sizing right is the difference between apparel your group actually wears and a box of shirts that never leaves the drawer. Sizing accuracy just takes a tape measure, a flat surface, and ten honest minutes.
When you're ordering for a nursing crew, a family reunion, or a team of teachers, one wrong size throws off the whole batch, and custom apparel can't be resold.
Below, we'll walk through measuring a t-shirt for printing, where artwork belongs on the chest, and how to scale designs across every size.
What You'll Need Before You Measure
Gather these before you start:
- A soft measuring tape (the flexible kind, not a metal carpenter's tape)
- A t-shirt that already fits the person well
- A flat, hard surface like a table or countertop
- A notepad or your phone for recording numbers
- A pencil to mark reference points lightly
One thing most guides skip: wash and dry that reference shirt first. Shrinkage can pull a cotton tee in noticeably, so measure it after laundering the way you normally wash clothes (fabriclink.com).
How to Measure a T-Shirt for Printing (The Laying Flat Method)
The laying flat method is the standard because it removes body posture and gives repeatable numbers. Lay the shirt on your table, smooth the wrinkles, and let it rest naturally, don't stretch it.
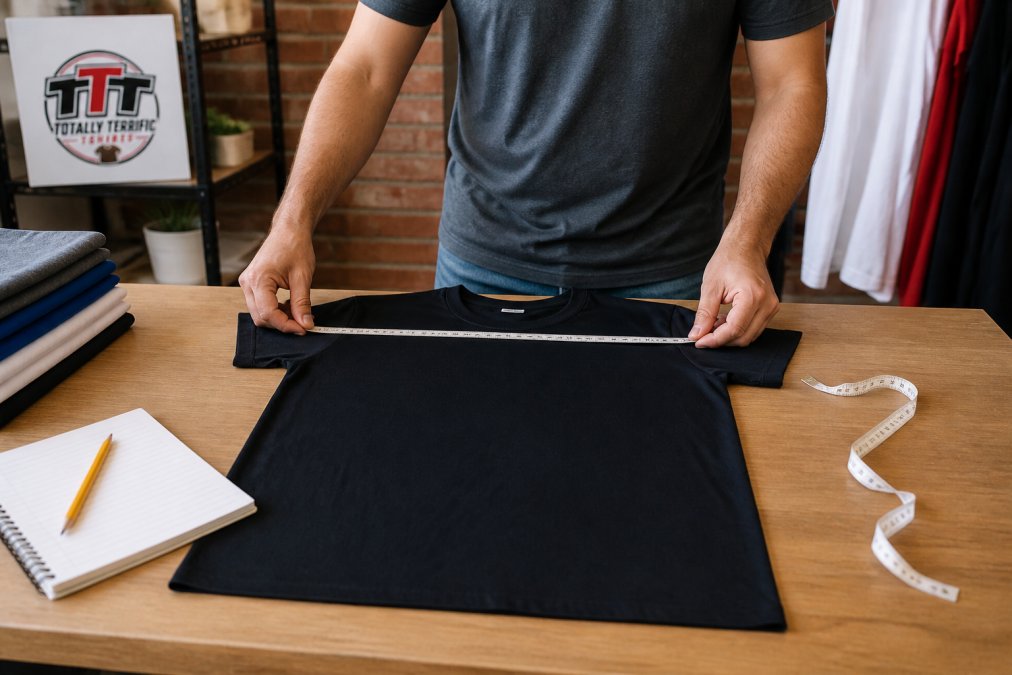
Step-by-Step: Measuring Armpit-to-Armpit, Shoulder Width, and Sleeve Length
- Armpit-to-armpit (chest width): Measure straight across from one armhole seam to the other, right at the base of the sleeves. Write this number down.
- Shoulder width: Find the seam where the sleeve meets the body. Measure from that point across the back to the matching seam on the other side.
- Sleeve length: Start at the shoulder seam and measure down the outer edge of the sleeve to the cuff.
- Body length: Measure from the highest point of the shoulder (near the collar) straight down to the bottom hem.
- Repeat for each size you're ordering in. A medium and a large can differ by more than you'd expect.
Matching Your Measurements to Standard Adult Sizes
Once you have your numbers, compare them against a garment specifications chart. Standard adult sizes follow consistent ranges, but brands vary, so treat any chart as a starting point.
| Measurement | Small | Medium | Large | XL |
|---|---|---|---|---|
| Chest (armpit-to-armpit) | 18 in | 20 in | 22 in | 24 in |
| Body length | 28 in | 29 in | 30 in | 31 in |
| Shoulder width | 17 in | 18 in | 19 in | 20 in |
These are typical flat-lay figures for a standard adult unisex tee. If your reference shirt measures 21 inches across the chest, you're between a medium and a large, sizing up is usually safer for custom apparel.
The T-Shirt Design Placement Guide: Where Artwork Actually Goes
A t-shirt design placement guide solves one problem: making sure your artwork lands in the same spot on every shirt. A design that sits perfectly on a small looks like it's floating too high on a 2XL if you use the same measurements across the board.
The fix is to anchor placement to the collar, not to the shirt's edges.
Collar-to-Print Distance and Center Chest Placement
Center chest placement is the most common spot for a logo or graphic, measured from the collar down to the top of the design. For a standard adult tee, that collar-to-print distance usually lands between 2 and 4 inches, centered left to right.
To find center: fold the shirt in half vertically, matching the side seams. The fold line is dead center. Mark it lightly, then measure outward from there if your design isn't centered.
How Design Placement Changes Based on Shirt Size
As shirts get larger, the printable area grows but the design shouldn't. Keep the artwork the same physical size and reposition it to stay proportional to the collar. On a small, a 10-inch-wide design covers most of the chest; on a 2XL it looks smaller relative to the body, so scale it up slightly for larger sizes.
Scaling Designs for Different Garment Sizes: The Math That Matters
Proportional scaling means adjusting your artwork size relative to the garment, not just stretching it. Most decorators use a 5 to 8 percent step per size, but that only works if you know your base and your ceiling.
Start With a Base Size and a Base Width
Pick one size as your control, medium is the usual choice for adult unisex tees. Measure your design's widest point at that size and write it down. Everything else scales from that number.
If your base design is 10 inches wide on a medium, the per-size ladder looks like this:
| Size | Multiplier | Design width |
|---|---|---|
| Small | 90% | 9.0 in |
| Medium | 100% (base) | 10.0 in |
| Large | 105% | 10.5 in |
| XL | 110% | 11.0 in |
| 2XL | 115% | 11.5 in |
| 3XL | 120% | 12.0 in |
That ladder keeps the design proportional to the body instead of letting it shrink into the chest of a larger shirt. If you'd rather hold one physical size across the run, that's valid too, just say so up front.
Know Your Print Area Limits Before You Scale
Scaling has a ceiling: the printable area of the garment. Know your print area limits before you scale. Once your design bumps those limits, stop scaling and reposition instead.
A Software Workflow That Keeps Batches Consistent
Fabric Shrinkage, Fabric Types, and Their Impact on Sizing
Fabric type changes everything about final fit, and shrinkage is why a shirt that measured perfectly on day one can look a size off after the first wash. This decides whether your print still looks centered three months in.
How Much Shrinkage to Expect by Fabric
Different blends move different amounts. The general pattern most decorators work from:
| Fabric | Typical shrinkage | What it means for your order |
|---|---|---|
| 100% cotton | Noticeable after first wash, mostly in length | Size up if the fit is borderline |
| Cotton-poly blend (roughly 50/50) | Minimal | Holds shape and print placement well |
| Tri-blend | Very little | Soft hand, stable fit |
| 100% polyester performance | Almost none | Best for repeated wear and wash |
Cotton shrinks most in length, not width, so a tee that felt right can suddenly sit shorter at the hem (textileschool.com). That shift drags your collar-to-print distance down, which is why a design that looked centered on day one can look high on day thirty.
The Wash-Test Method for Accurate Measurements
Before you measure a reference shirt, launder it the way the wearer actually washes clothes, warm or cold wash, normal dry cycle. Then measure it flat. That post-wash number is the one that holds, and the one to match against your garment specifications chart.
If you can't wash-test every size, wash-test one shirt in the fabric you're buying and apply that shrinkage to the rest of the run. A single test shirt saves a whole batch.
Pre-Shrunk, Ringspun, and What the Label Actually Tells You
"Pre-shrunk" means the fabric went through a shrinking process before cutting, not that it will never shrink again. Ringspun cotton is softer and tends to shrink a bit more than standard cotton (textileexchange.org). If your group wants matching shirts they'll wear for years, a cotton-poly blend or performance fabric holds both fit and print placement better.
Custom T-Shirt Printing Without Minimums: Why Small Orders Still Need Accurate Sizing
Custom t-shirt printing without minimums means you can order exactly five shirts for your friend group without a bulk buy. That flexibility is useful, but it doesn't remove the need for accurate sizing, small orders make every measurement count more, with no cushion of extra shirts to fall back on.
Small orders are where details pay off. A nursing team representing their unit, teachers coordinating for the first day of school, or a family grabbing patriotic tees for a reunion all want the same thing: shirts that fit and look intentional. Fewer shirts means less room for error, so measure carefully and double-check before you submit.
Common Sizing Mistakes to Avoid (And How to Fix Them)
Most sizing errors trace back to a handful of repeat offenders. Here's how to sidestep each one.
| Mistake | The Fix |
|---|---|
| Measuring a shirt before washing | Launder first, then measure |
| Using body measurements only | Measure the garment, not the person |
| Same placement on every size | Anchor to the collar, adjust per size |
| Enlarging low-res artwork | Start from vector or 300 dpi files |
| Ignoring fabric shrinkage | Size up on 100% cotton when borderline |
| Guessing at center | Fold the shirt to find the true center |
The single biggest fix is patience. Take ten minutes to measure a shirt that already fits, write the numbers down, and match them to a garment specifications chart. That one habit eliminates most sizing problems that ruin custom orders.
And when you're ready to turn those measurements into shirts that start conversations, a funny fun tee, a patriotic design, or something for your faith community, we've got you covered.
Sizing accuracy is the unglamorous step that decides whether your custom shirts get worn or forgotten. Totally Terrific Tshirts makes it easy to order exactly what you need, with designs built to spark meaningful conversations and inspire connectivity, whether you're outfitting a nursing crew, a group of teachers, or a family of country music lovers. With no minimums to force your hand and free shipping on orders over $75, you can order the right count at the right sizes. Get started with Totally Terrific Tshirts and browse our custom apparel collection to find designs that fit your people and your story.
Frequently Asked Questions
How big should a design be on a 2XL shirt compared to a medium?
If you keep the same artwork size across all sizes, the design will look small on larger shirts and cramped on smaller ones. Scaling your design up or down proportionally for each size jump can help maintain the intended look.
How do I measure a shirt for the best custom fit at home?
Grab a shirt you already own and love, lay it flat on a table, and smooth out any wrinkles. Measure armpit-to-armpit for chest width, then from the collar seam down to the hem for body length. Write those numbers down and compare them to a sizing chart. This method is far more reliable than guessing from your body measurements alone, because it accounts for how you actually like your shirts to fit.
Does design placement change based on shirt size?
Yes, and ignoring this is one of the most common mistakes in custom apparel. A center chest placement that sits perfectly on a small shirt may look too high on a 3XL because the collar-to-print distance stays roughly the same while the body gets longer. For larger sizes, dropping the design down slightly and widening it can help. Adjusting placement to stay proportional to the collar is key.
How can I make sure my custom shirt still fits after washing?
Fabric shrinkage is real, especially with 100 percent cotton shirts. Most cotton tees shrink about 3 to 5 percent after the first wash, which can mean losing half an inch to an inch in length. If you are between sizes, size up. Wash in cold water and tumble dry on low to minimize shrinkage. Blended fabrics like cotton-polyester mixes shrink less, so if fit consistency across a group order matters, a blend is often the safer pick.